- Honeycrisp
Theme
Below you will find comprehensive installation and set up instructions for this theme. If after following this guide, you run into any technical issues, please feel free to contact support.
Basic Customization
Let’s customize your site! To being, navigate from the Dashboard to Appearance → Customize. This is where you’ll add colors, fonts, style the header & footer, and more.
Add your colors, fonts, and logo
We’ll start by adding your brand colors, fonts, logo, and favicon. Follow along in the video!
Useful links:
A note on logo, colors, & fonts: collectively, these are elements of branding or brand design.
For the most cohesive and impactful visual appearance of your website (and brand as a whole), you may want to consider hiring a brand designer. However, I understand that branding is not in the budget for many folks especially those newer to getting their business off the ground.
If you’re not ready to invest in branding yet, I suggest at least exploring a variety of color palettes instead of randomly picking colors for your site. The website coolors.co is a great resources for playing around with different colors. Want to explore different fonts? Check out Google Fonts. All the Google Fonts come pre-installed on your website.
Upload a custom font
Do you have a custom font you want to upload onto your site? I suggest the Use Any Font plugin – found in the plugin directory.
You should upload your font in multiple formats if possible, to ensure it works on all browser types. If your custom font is OTF or TTF format, use a website like transfonter.org or fontsquirrel.com to convert your font to all other available formats: EOT, TTF, WOFF, WOFF2, and SVG. Then upload all these variations into the Use Any Font plugin.
Create Menus
The next step is to create the main navigation menu for your website. This means you need to decide which pages your website will include.
Most dietitian websites will include (at the minimum) the following pages: Home, About, Services, Blog, Contact. However, it’s up to you to decide what’s important to use on your website!
Watch the video or use the written guidelines & screenshots below
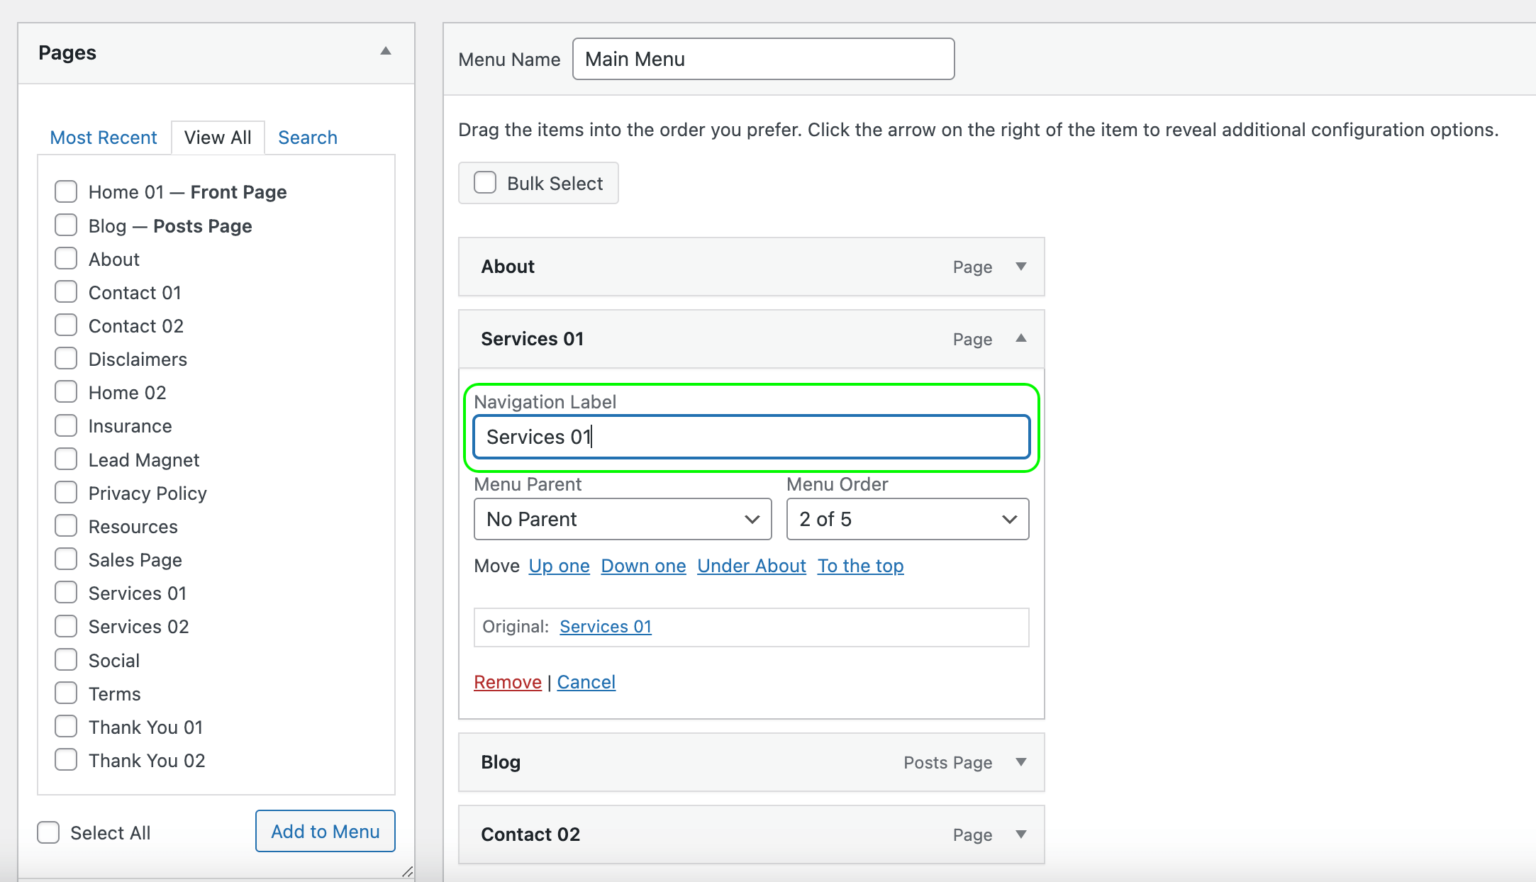
To create your navigation menu, go to Appearance → Menus. Click create a new menu.

Then give your new menu a name, choose “primary” as the display location, and hit create menu. Then you can pick your desired pages from the lefthand column, click Add to menu, then drag menu items around into your desired order.
To change the way the page name appears, click the down arrow and change the Navigation Label. For example maybe you have a page called Services, but you’d like it to read Nutrition Counseling in the navigation menu instead.
FYI, I usually don’t include “Home” in the menu, because website visitors can simply click your logo to get back to the homepage. Try to keep your menu as streamlined and uncluttered as possible so it’s easy for your visitors to navigate.
Further documentation from WordPress on how to create a menu can be found here.
Header Styling
Let’s build your header. Kadence theme has an easy-to-use header builder tool which you will find at Appearance → Customize → Header. There are several things going on here which are easier explained in video, so follow along.
To summarize:
- Update the announcement banner (or delete if you don’t want it)
- Style and update your social social links
- Style the header for desktop, tablet, and mobile – including the “popup” nav menu for tablet/mobile
- Make sure to update the Contact button or change to another Call To Action (CTA)
Footer Styling
The footer is next. Style your footer at Appearance → Customize → Footer. Here’s how to style it:
In summary:
- Widget 1: replace logo & description with yours
- Widget 2: add links to key pages
- Widget 3: update links and preferred contact info
- Copyright: make sure the copyright widget includes the correct info. If the “site title” is wrong, you can edit this by removing the Site Title placeholder and typing directly into the widget; or, by going back out to the Dashboard, then go Settings → General and modify your Site Title.
Setup Maintenance Mode Page
I’ve included a simple Maintenance Mode template you can use if you’d like to keep your site “hidden” as you’re working on it.
If you’ve been able to follow along so far to update the header and footer widgets, the maintenance mode template will be a breeze!
Once you’ve updated your Maintenance Mode page template, you need set this page as your homepage. People will see this page when they visit your site and the rest of your website pages will be hidden.
To set it as the homepage, navigate to Settings → Reading → Your homepage displays → Homepage and select Maintenance Mode from the dropdown box. Once your site is ready to go live, you’ll switch this back to the actual homepage (and don’t worry, I’ll remind you to do this at the very end!).
Next up: let’s set up the blog & recipe archive.
Honeycrisp Setup Guide