
This article features an affiliate link, meaning I’ll earn a small commission if you make a purchase using my affiliate link. I only link to products and retailers that I use myself and recommend!
Introduction
If you are a dietitian exploring insurance billing, you know the process can feel a little (okay, a LOT) overwhelming.
I transitioned my private practice to primarily insurance-based in 2024. After all the paperwork and all the waiting around… finally, I was in-network with several commercial insurance providers. Woohoo! But, that’s just the start.
After signing my contracts and announcing to the world I was now accepting insurance, I realized, “oh crap! Now I need to figure out how to actually bill for my services & get paid!” 🙃
Luckily, my EMR Practice Better was offering a new integration with Claim.MD, a clearinghouse service that allows you to submit claims directly through the Practice Better patient portal. Having no other experience submitting claims to commercial insurance plans, I figured I’d give it a shot.
Now if you’re saying to yourself, “okay wait a second, I don’t even know what a clearinghouse is..? Apparently, I need one…? How the heck do I figure all this stuff out??” — no worries fellow RD, allow me to help.
Billing insurance may feel complicated and scary, but take it from me. I am a prime example of someone who swore up and down I would never have an insurance-based practice…. and look at me now, I’m a provider who runs a primarily insurance-based practice 😅 And if I can do it, I KNOW you can do it too.
By the way, this article assumes you already have your insurance contracts set up (if not – that’s a topic for another day!). Let’s get into it.
How Insurance Billing Works: An Overview
You most likely have insurance yourself, so you kinda know how it goes from the patient’s perspective. But, how does it work as a provider?
Billing a patient’s insurance means you’re submitting a claim to their insurance company. A claim is a standardized way of telling the insurance what services you provided to the patient. The insurance company processes the claim, then, assuming all goes well, they pay you for the service you provided.
A couple of key things are needed to make this happen:
- Your patient’s insurance information
- A way to create a claim
- A way to submit a claim
If using Practice Better as your EMR, you can easily set it up to capture your patient’s insurance information and create claims. Let’s begin there!
Set Up Your Insurance Billing Profile In Practice Better
The first thing to do is configure your Insurance Billing Profile. Navigate to Setting & Preferences → Insurance Billing. On this page, you will set up some default items to pre-populate on new claims you create.
First, you’ll set up your Company Profile.
Company Profile
The information in this section reflects the “billing provider” – the person or group submitting the claim and requesting payment for services. If you’ve ever seen or completed a CMS-1500, information about the billing provider goes in Box 33.
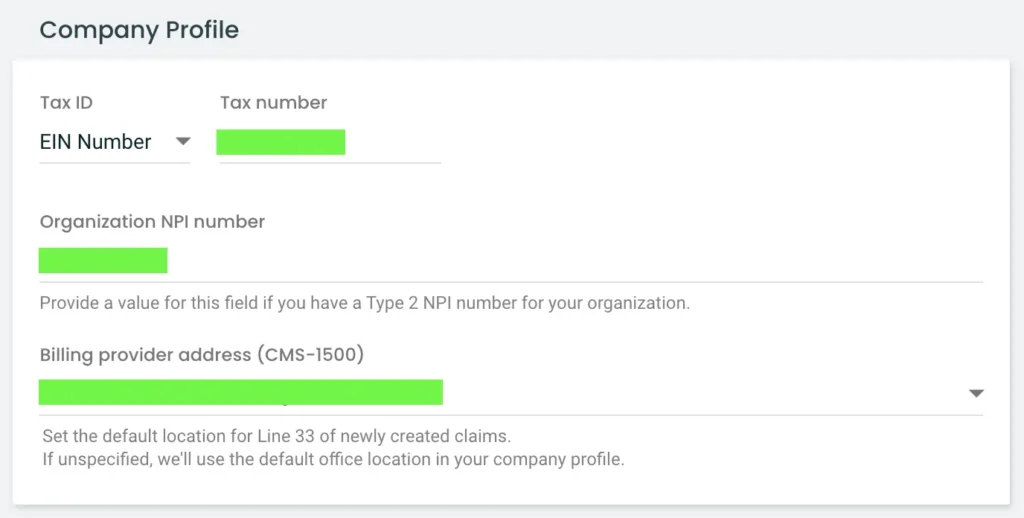
IMPORTANT: The billing provider you use on your claims may not always be the same. This is because some insurance providers contract individuals, while others contract groups.
If you contracted with an insurance company as an individual, YOU are the billing provider. That means your type 1 NPI is the correct one to use. For example, I am contracted as an individual with BCBS. So I put my type 1 NPI as the billing provider on BCBS claims.
If you contracted as a group, YOUR PRACTICE (and therefore your type 2 NPI) is the billing provider. Again, as an example, Medicare only contracts groups – you must have a type 2 NPI to contract with Medicare. So on my Medicare claims, I use my type 2 NPI as the billing provider.
If, like me, you have both group and individual contracts, pick one to list on your Company Profile in Practice Better. You can always adjust it on the actual claim, based on the payer you’re submitting to.
Insurance Payers
Next, add any Insurance Payers you submit claims to. Essentially you’re just adding the name and payer ID for each insurance company you submit to. This will make it easier to find payer IDs when submitting claims.
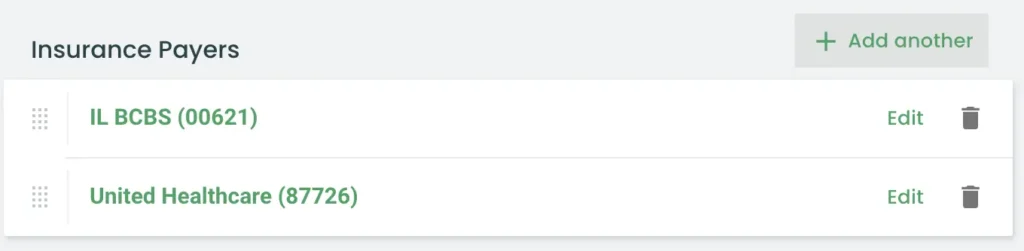
Not sure where to find these payer IDs? You can grab them from your Claim.MD account once we get to that part, or you can check their full list of payers here.
Another important thing to know: you always submit claims through your LOCAL insurance product. For example: I am contracted with Blue Cross Blue Shield thru my local BCBS of Illinois (BCBSIL). I can also submit claims for patients with BCBS of TX, BCBS of Alabama, Florida Blue, etc. These claims still get submitted to my local BCBS using payer ID 00621.
You can also manually input the payer name and payer ID on each claim you complete. But adding them here makes it easier to find your most frequently used ones.
My Profile
Next, in the My Profile section, add your type 1 NPI and provider taxonomy (133V00000X is the taxonomy code for Registered Dietitians).

The NPI in this section refers to the “rendering provider”, aka Box 24J on the CMS-1500. The rendering provider is the provider who provides the counseling services to the patient.
And so it continues. The next few boxes allow you to set up additional “pre-sets” for any claims you submit – whether you want to enable “Accept Assignment” by default, your default place of service, service facility (your practice address), and frequently used procedure codes and diagnosis codes.
My most commonly used Procedure Codes are as follows:
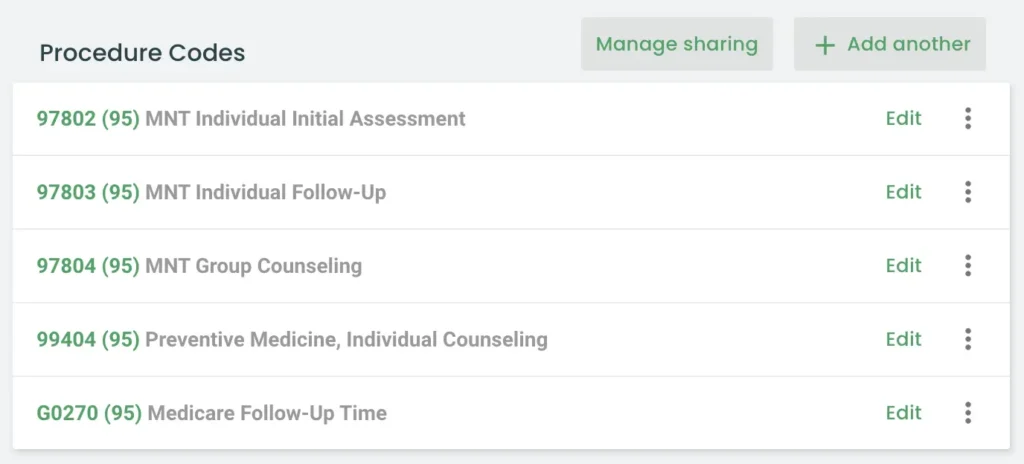
The modifier 95 refers to telehealth since the vast majority of my sessions are telehealth appointments.
Here are some of my saved Diagnosis Codes.
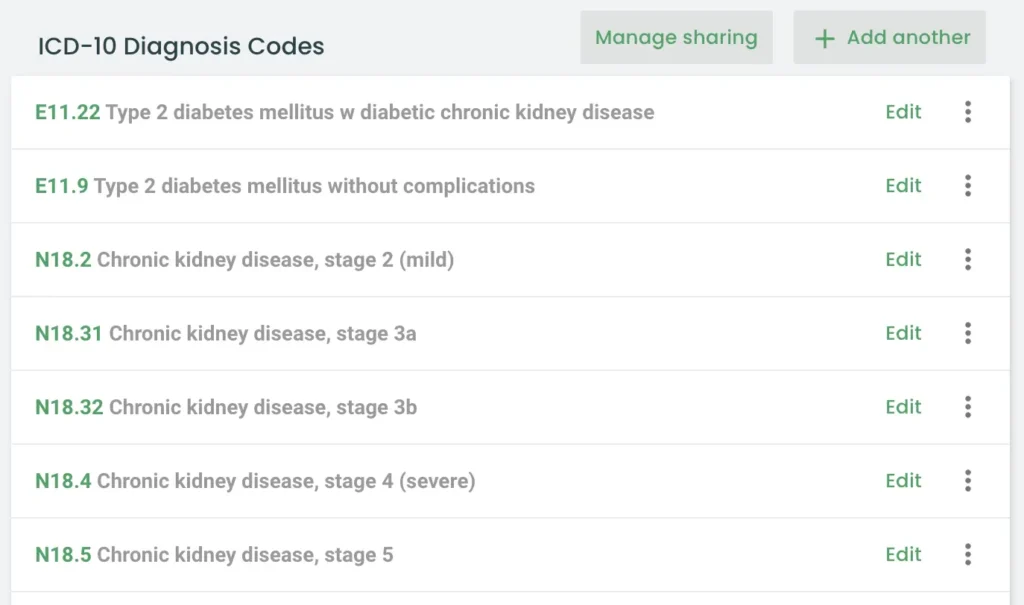
The most common code I use on claims is Z71.3 (Dietary counseling and surveillance) — unless I’m seeing a patient whose insurance requires a referral with a specific diagnosis.
That’s it – don’t forget to hit “save” at the top of the page!

Create A Form to Capture Insurance Information
If you’re a Practice Better user, I’m sure you’re already taking advantage of their Forms functionality to capture various types of information from your patients.
And it is super simple to get your patient’s health insurance through a form!
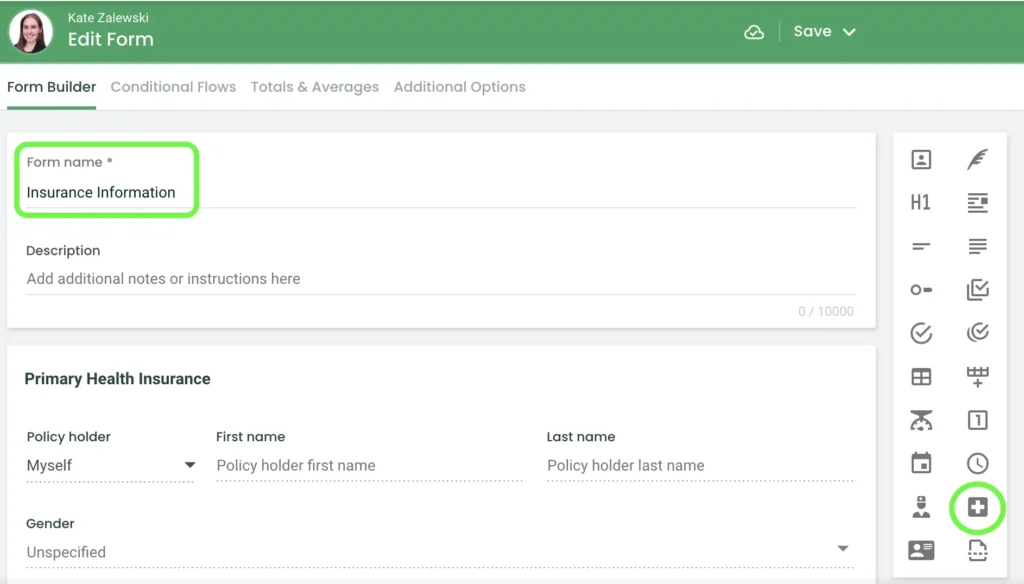
You can either create a new form specifically for health insurance details, or, you can add a health insurance section to an existing form (such as your patient intake form).
Below, I’m creating a new form titled “Insurance Information”. The cross icon on the right-side panel is the one that adds a section for health insurance.
After saving this form, you’ll need to set up a new Form Mapping to pull the insurance information on this form into the Insurance section in your patient’s profile. See below.

Then, I suggest setting up an Automation so the insurance information can be imported automatically.
If you aren’t familiar with Form Mapping and Automations, check out Practice Better’s Help section for more guidance.
The next time a new patient completes this form, their insurance information will be automatically imported into their profile. Nice!! 🙌
Just as a note, you may also want to have your patient upload a scan/photo of their insurance card to the Documents section of the portal. That way, you can take a peek at the card and find the member services number if you run into any issues.
Set up Claim.MD
Now that Practice Better is set up for Insurance Billing, set up your Claim.MD account! You can start by scheduling a demo with the friendly staff at Claim.MD.
Claim.MD is a clearinghouse – the software used to electronically transmit claims between the provider and the insurance company.
I use Claim.MD’s Basic Plan which is $25/month + $0.30 per claim transmitted. There is a $100 one-time set-up fee associated with the Basic Plan. You can review all their plans here.
Once you create your Claim.MD account you need to complete Provider Enrollment. In other words, add your billing providers.
Add Providers
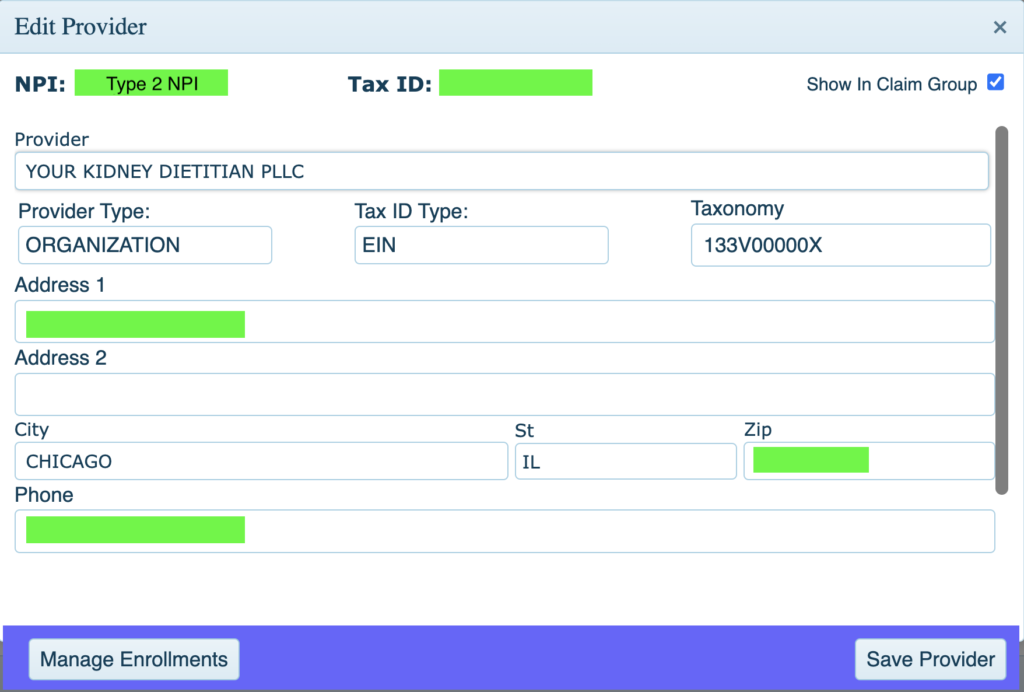
As mentioned before, whether you bill using a type 1 or type 2 NPI depends on how your contract is set up. If you have some group contacts and some individual contracts, you should create a Provider record for both billing NPIs.
Below, you can see the Provider record for my type 2 NPI. My business, Your Kidney Dietitian PLLC, is the provider. Provider Type should be “organization”.
If you are creating a record for an individual provider, use your type 1 NPI instead and choose “individual” as the Provider Type.
After you have created and saved this record, click on Manage Enrollments.
Manage Enrollments For Each Billing Provider
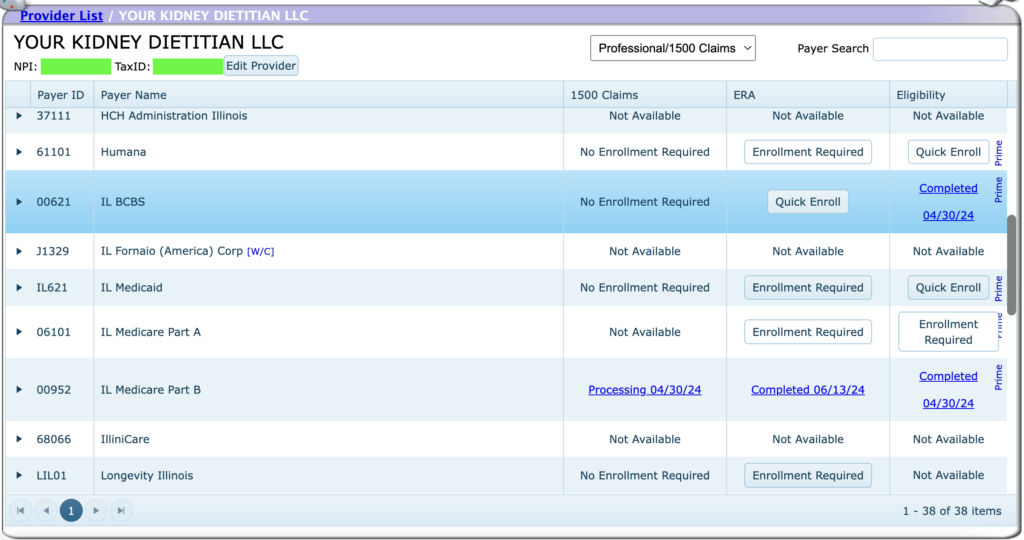
Below is what you see after clicking on Manage Enrollments.
To submit claims and receive ERA (electronic remittance advice), the next step is to enroll with each provider you submit claims to. Generally speaking, no enrollment is required to submit CMS-1500 Claims. You will need to enroll to receive ERA in most cases.
If you see a “Quick Enroll” button, that means all you need to do is click Quick Enroll to be able to receive ERA from that payer.
If there is an “Enrollment Required” button, there’s some additional information needed in order to receive ERA from that payer.
If you need additional help getting Claim.MD set up, they have a VERY helpful knowledgebase on their website. You’ll find a super in-depth overview of what I explained above, plus so much more.
Again, the Claim.MD staff is very helpful if you run into any issues. You can get in touch by calling them or by submitting a support ticket in your portal.
Create A Claim In Practice Better
We are all set up and it’s FINALLY time to submit your first claim in Practice Better!
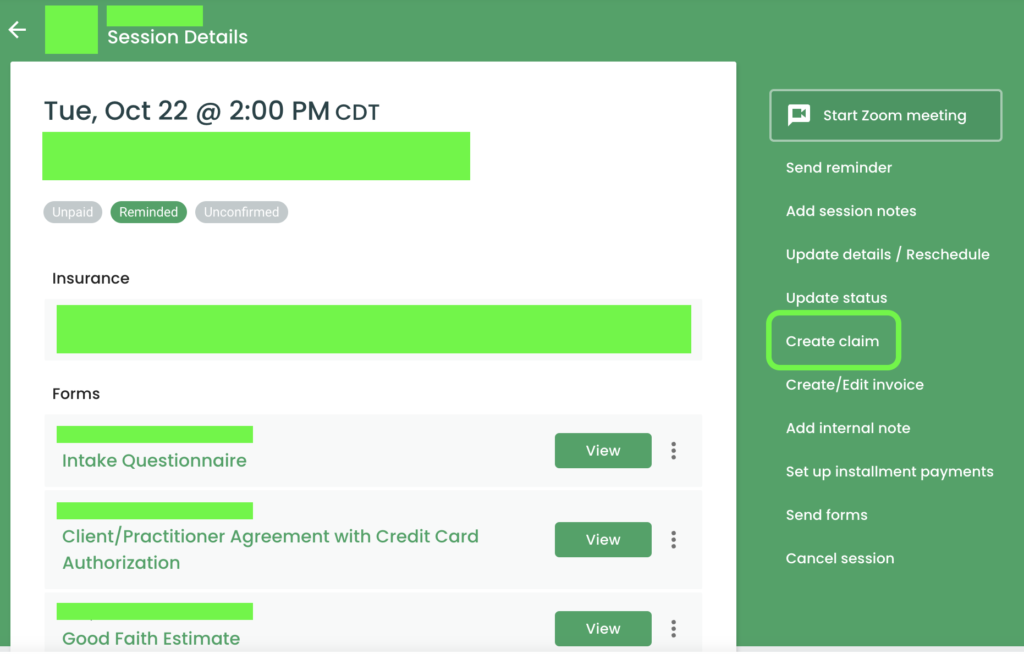
After you’ve met with your patient, navigate to the page that shows the Session Details. Then click Create claim.
A form appears that will be pre-populated with the patient’s info, their health insurance, and other pre-sets from your Insurance Billing Profile. If any part of the form doesn’t look quite right, you can manually type into the form and adjust anything you need to.
One section that will probably be incomplete is Services & Procedures. Make sure you have the right procedure code, POS, units, cost per unit, procedure modifier, diagnosis code, and rendering provider NPI number (type 1 NPI of the provider who saw the patient).
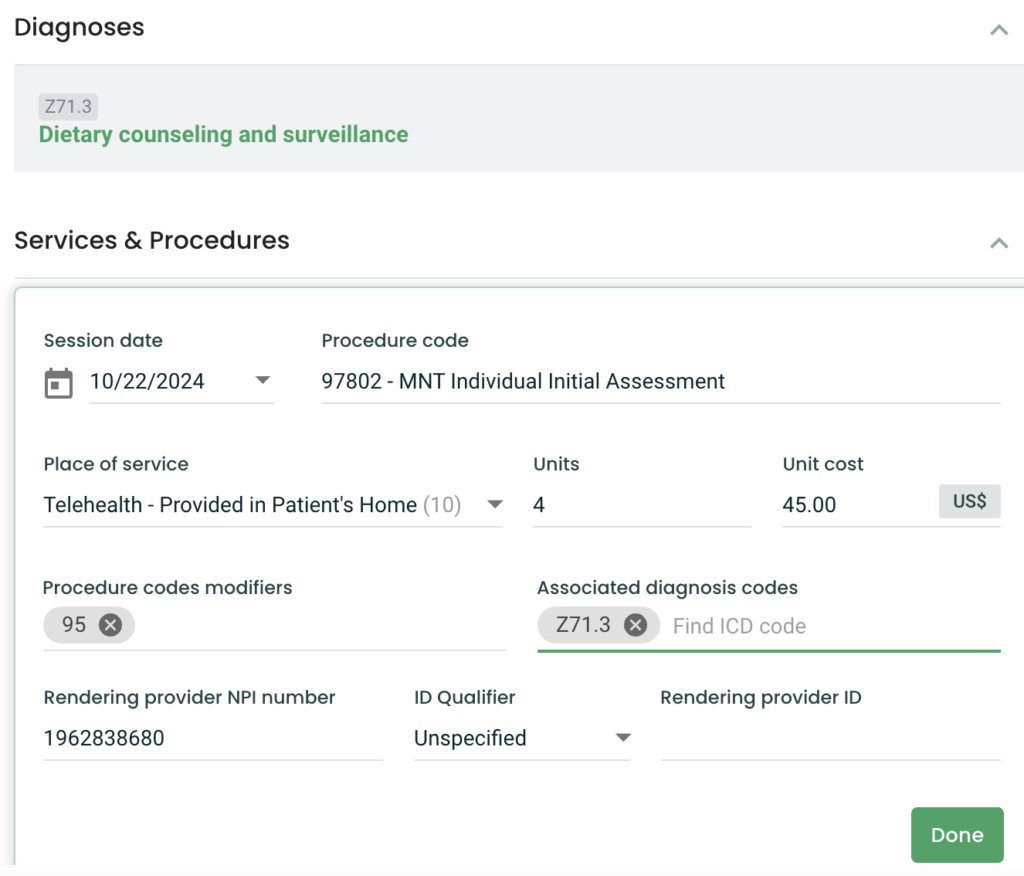
In the Billing & Provider Information section, make sure the correct Payer Name and Payer ID is listed. Use the “Search payers” box to search for a payer you added to your Insurance BIlling Profile.
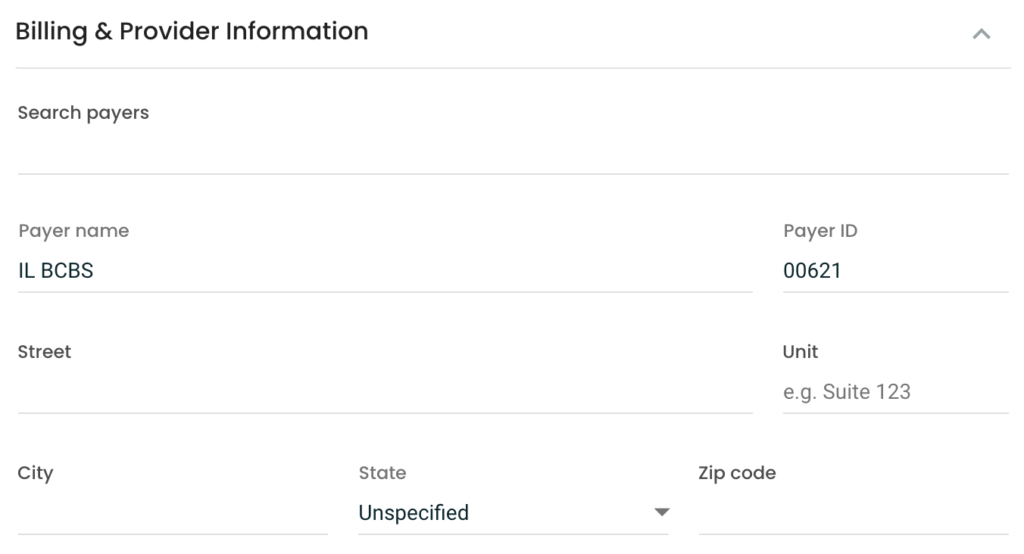
Keep in mind that the Payer Name and Payer ID will automatically be filled in if your patient added a Payer Name and Payer ID when completing their insurance information form (the Practice Better form you created to capture their insurance info).
However, this is NOT necessarily the right payer to bill.
For example, my patient might have BCBS of Alabama insurance (payer ID 00510). However, I still bill through my local BCBS which is based in Illinois. So I need to change the Payer Name and Payer ID to reflect my local BCBS – BCBSIL with payer ID 00621.
Make sure to save the claim. After this, there is ONE MORE STEP to submit the claim.
The claim you’ve just created is in “draft” mode. Navigate to My Practice → Insurance Claims. You should see your newly created claim listed here with the status column indicating it’s in draft mode. Click the 3 dots icon on the right side of the claim and choose “Update status”.

A box will pop up where you can change the claim from “Draft” to “Ready to submit”.
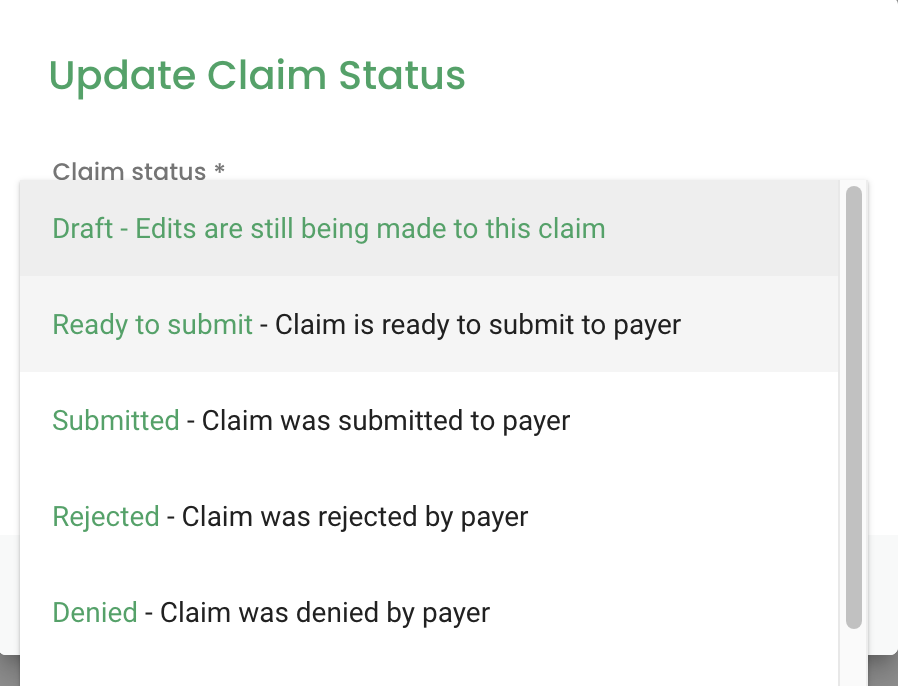
The claim status will now show “ready to submit” instead of “draft.” From here, Practice Better will automatically send your claim over to Claim.MD, and from there it will be sent off to the insurance company.
Wait For The Claim To Process
And that’s it! Now you sit around and wait to see if the claim was successfully processed. If it’s accepted, Practice Better will send you a notification that the claim was accepted.
If it gets rejected, Practice Better will also notify you. And if that’s the case, no worries, you can easily correct the claim in Claim.MD and resubmit it.
How fast the claim processes (and how fast you get paid) depends on the payer. For BCBSIL, my claims process within about a day. For Medicare, it takes 2-3 weeks.
Once the claim is processed and paid, the Status will change to “Paid” as shown in the below image.
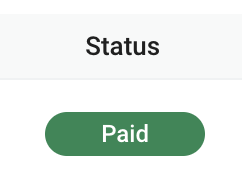
The first time you see that “Paid” show up, I just KNOW you are going to be so proud of yourself!! Give yourself a big pat on the back for figuring this out all on your own 👏🎉💪
Conclusion
I’ll be honest, this was a LONG blog post. It took me a lot longer to write than I thought it would 😅 kinda like the whole process of setting up PB + Claim.MD….
So, full transparency, billing insurance on your own DOES take some time and some work…. as you get everything set up, and get comfortable with how it all works.
But once you’re set up, the process is quite simple! Now that I’m familiar with how to bill, it takes me less than a minute to submit a claim.
I sincerely hope this article was helpful to anyone wanting to use the Practice Better / Claim.MD integration. Billing directly through my EMR has made my life VERY easy.
And as you know, billing is just one part of running a private practice! This is one reason I looooove working with fellow dietitians on their websites – because I know EXACTLY what it’s like to run a business like yours.
My past web design clients appreciate my design know-how AND they love my in-depth knowledge on the other aspects of running a private practice – including the best software, programs, and services to help you be successful.
Want to work together on your site or need help with other aspects of your business? Reach out and let me know! I can’t wait to help you.
free!
Launch Your List
A free Mini-Course on How to Launch your Email List with Kit (Formerly ConvertKit)
In this 18-lesson course, you’ll learn the exact steps I follow to set up an email list for my clients. Plus, get my time-saving Welcome Sequence template + Canva Lead Magnet template. Sign up & get access to the course right away!